Nozzle Techniques & Hose Handling: Part 3
The previous posts in this series, examined the importance of proficiency in use of the firefighters’ primary weapon in offensive firefighting operations, and outlined several drills that can be used to develop proficiency in basic nozzle operation and hose handling.
Developing proficiency in nozzle use is somewhat like building skill with a rifle. Understanding what end of the rifle the bullet comes out of and that the rifle is fired by pulling the trigger is the easy part, learning to consistently hit what you are aiming at over varied distances requires considerably more effort.
This is my nozzle, there are many like it but this one is mine. My nozzle is my best friend. It is my life. I must master it as I master my life. Without me it is useless, without my nozzle I am useless.
I will use my nozzle effectively and efficiently to put water where it is needed. I will learn its weaknesses, its strengths, its parts, and its care. I will guard it against damage, keep it clean and ready. This I swear [adapted from the Rifleman’s Creed, United States Marine Corps].
In the first three nozzle drills learners develop basic proficiency in basic nozzle use (fixed position), integrating nozzle use while moving a hoseline forward and back, and use of the nozzle while moving the hoseline through varied size compartments. This post will provide an overview of door entry procedures.
Door Entry Concepts
For many firefighters, door entry is simply a process of remembering to “try before you pry” and then figuring out how to force the door if it is locked. For others it is simply kicking the door in! Often overlooked is the fact that the entry point is a ventilation opening; sometimes an inlet, sometimes an outlet, and often both. When the fire is ventilation controlled, opening the door and increasing air flow to the fire will result in increased heat release rate. Depending on the stage of fire development and conditions within the compartment or structure, this may result in extreme fire behavior such as a ventilation induced flashover or backdraft (see Fuel & Ventilation).
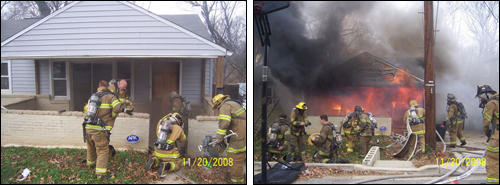
As illustrated in Figure 1, firefighters often encounter rapidly changing conditions after making entry. In this incident, flashover occurred less than 60 seconds after firefighters opened the door and made entry (see Situational Awareness is Critical for additional information on this incident)
Figure 1. Rapidly Changing Conditions

Note: Photos by Probationary Firefighter Tony George, Prince Georges County Fire Department.
Safe and effective firefighting operations depend on effectively reading the fire and recognizing potential stages of fire development and burning regime (see previous posts on Reading the Fire) and effective tactical operations to take control of the fire environment. Door entry is an important element in this process.
Door Entry Procedure
As you review this door entry procedure, you may find that it makes sense to you exactly as presented. On the other hand, you may find that some elements (e.g., size-up and dynamic risk assessment) make sense, but other components (e.g., cooling overhead prior to opening the door) require a bit more of a leap. The elements of the door entry process reinforce one another, adopt the elements that make sense to you, but consider the value of the procedure as an integrated process. The process outlined is not followed in a lock-step manner, it is important for the hose team to take action based on observed conditions.
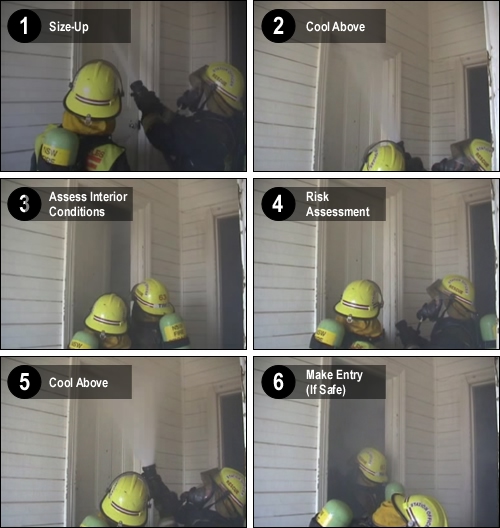
Size-Up: Door entry begins with a focused size-up as you approach the building. Assessment of conditions is not only the incident commander or officer’s job. Each member entering the building should perform a personal size-up and predict likely conditions. When making entry, size-up becomes more closely focused on conditions observed at or near the door and includes an assessment of potential forcible entry requirements as well as B-SAHF (Building-Smoke, Air Track, Heat, and Flame) indicators. If available, a thermal imaging camera (TIC) can be useful, but remember that temperature conditions may be masked by the thermal characteristics of the building. If a thermal imaging camera is not available, application of a small amount of water to the door may indicate temperature and the level of the hot gas layer (water will vaporize on contact with a hot door).
Size-up begins as you exit the apparatus and approach the building, but continues at the door and after you make entry!
At the door, pay close attention to air track and heat (door temperature) indicators as these can provide important clues to conditions immediately inside the building!
Control the Door: If the door is open, close it. If it is closed, don’t open it until you are ready. Heat release requires oxygen, controlling the air supply to the fire controls heat release rate. If you force the door in preparation for making entry, make sure you maintain control of it.
Gas Cool Above the Door and Assess, and Control Interior Conditions: When you open the door to assess conditions inside, hot smoke will likely exit at the top of the door. If it is hot enough it may auto-ignite. The hazard presented by the exiting smoke can be reduced by applying two short pulses above the door just as it is opened (the firefighter controlling the door should crack the door as the first pulse is applied).
The door should be opened sufficiently to allow the nozzle operator to visualize interior conditions, but not so much that a large amount of air is introduced (no magic number on how far to open, “it depends”). If hot smoke is present, the nozzle operator should cool the gases inside the compartment from the doorway. This may involve a short pulse or two or it may involve a longer pulse, depending on the size of the compartment and conditions (again, this requires the nozzle operator to think!).
Close the Door: While there is often a sense of urgency to make entry (due to developing fire conditions, persons reported, etc.), this step is important as it provides an opportunity for a focused risk assessment.
Risk Assessment: Is it safe to make entry (or to make entry through this opening)? Fully developed fire conditions inside the door or a pulsing air track (indicating potential for vent induced flashover or backdraft) may indicate a need to consider alternative tactics).
Entry: If it is safe to make entry, the process of cooling above the door as it is opened is repeated and hot gases inside the compartment are cooled as the hose team makes entry.
Figure 2. Door Entry Procedure

Note: Adapted from video clip 00000010 on the 3D Firefighting: Training, Techniques and Tactics Resource DVD.
Remember: The purpose of door entry procedures is to reduce risk of extreme fire behavior during and immediately after entry! Door entry procedures should be used any time that hot smoke or flames may be on the other side of the door. These procedures are used at exterior doors when making entry and on closed doors encountered inside the building.
Drill 4-Door Entry-Inward Opening Doors: Many doors (particularly interior and exterior residential) open inward (away from the nozzle team), door entry requires that the hose team integrate forcible entry, door control, and nozzle operation. Practicing door entry procedures with a variety of inward opening door configurations (location of the door in relation to walls and with varied size compartments) is critical in developing proficiency.
Drill 5-Door Entry-Outward Opening Doors: Commercial doors (and some interior doors) will open outward (towards the hose team). Outward opening doors require a somewhat different position when performing door entry. Firefighters must develop skill in performing door entry with both inward and outward opening doors.
Hose Handling & Nozzle Technique Drill 4 & 5 Instructional Plan
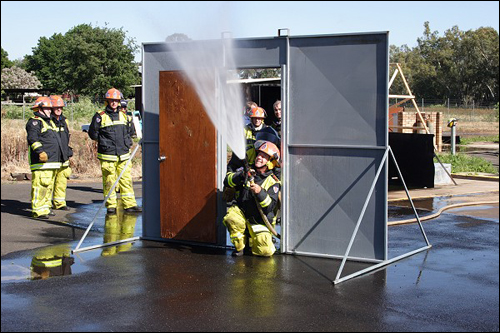
These two drills can be conducted using any door where water can be applied. However, a free-standing door entry prop (see Figure 3) provides a simple and effective aid to developing door entry proficiency.
Figure 3. Door Entry Prop

Note: Photo by Inspector John McDonough, ASFM, New South Wales Fire Brigades.
Alternately, a forcible entry prop could be used to integrate the forcible entry component of the door entry process.
Drills
As discussed in Nozzle Techniques and Hose Handling: Part 2 [LINK], it is essential for firefighters to have the ability to react immediately to deteriorating conditions. While battle drills will be discussed in depth in a subsequent post, consider how this concept might apply during door entry. What action should the hose team take if they encounter strong indicators of backdraft conditions at the doorway (e.g. pulsing air track, thick (optically dense) smoke)? How should the hose team react if, despite following good practice, conditions worsen immediately after entry?
Ed Hartin, MS, EFO, MIFireE, CFO
References
Grimwood, P., Hartin, E. McDonough, J. & Raffel, S. (2005). 3D firefighting: Training, techniques, and tactics. Stillwater, OK: Fire Protection Publications.
Tags: 3D firefighting, B-SAHF, deliberate practice, door entry, Fire Behavior Training, nozzle techniques, reading the fire


November 24th, 2009 at 04:47
hello Ed,
thanks for this wonderful article,here is the link to the french translation:
http://chezfireball.blogspot.com/2009/11/passage-de-porteconcepts.html
i will add the link for the pdf 4 and 5 drill,later.
this article is simply amazing,cause in France,we do not have such article with so many details concerning the door entry concepts.
November 27th, 2009 at 07:29
hello,
here is the link to the translation in french of the drills 4 and 5:
http://chezfireball.blogspot.com/2009/11/exercice-4-et-5passage-de.html
November 27th, 2009 at 09:16
Thanks Laurence!
February 25th, 2010 at 06:39
Laurence, I suggest you to read that:
http://www.flashover.fr/modules.php?name=News&file=article&sid=70&mode=thread&order=0&thold=0
Date of realease is october 2007… We train Belgium FF to this kind of technic till June 2007 (more than 2000 FF instructed) and it’s the official way of doing, also at the Brasilia Military FF Service, and in some French fire, and also in Poland.
You’ll find also here:
http://www.flashover.fr/modules.php?name=News&file=article&sid=83&mode=thread&order=0&thold=0
an article about the 5 nozzles tech we use and link to articles with details about that.
Best regards
Pierre-Louis
May 30th, 2013 at 09:29
[…] open it until you are ready. If the door is unlocked, control is generally a simple process (see Nozzle Techniques and Hose Handling: Part 3 for detailed discussion of door entry when the door is […]
June 17th, 2013 at 14:18
[…] Nozzle Techniques & Hose Handling: Part 3 for additional information on door entry […]